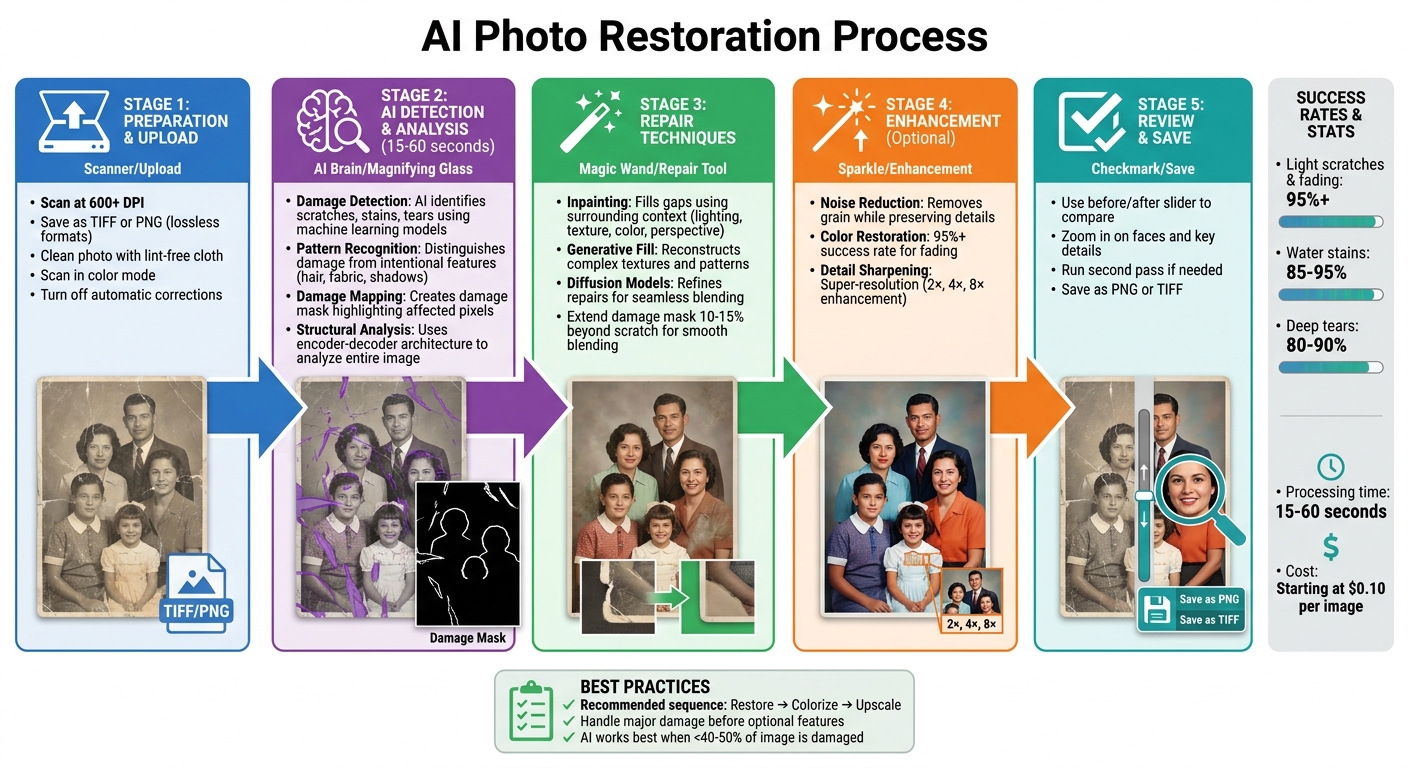
How AI Repairs Scratches in Old Photos
AI has made photo restoration fast, easy, and affordable. Instead of relying on costly professionals or spending hours editing, you can now restore old photos in seconds. Here's how it works:
- Damage Detection: AI identifies scratches, stains, and tears using advanced models trained on millions of images.
- Repair Process: It uses techniques like inpainting and generative fill to reconstruct damaged areas, blending them seamlessly with the rest of the image.
- High Accuracy: Light damage sees over 95% success rates, while moderate issues like water stains reach 85–95%.
- User-Friendly: Upload your scanned photo, let the AI analyze it, and get results in under a minute.
AI tools also improve photo quality by reducing noise, restoring colors, and sharpening details. For best results, scan photos at 600 DPI or higher, save in lossless formats like PNG or TIFF, and handle major damage before applying optional features like colorization or upscaling. With prices starting as low as $0.10 per image, preserving family memories has never been easier.
How AI Restores Old Photos: Complete Process from Scan to Restoration
Restore Old Photos with AI (Without Changing Anything!)
sbb-itb-903b5f2
How AI Detects Scratches and Damage in Photos
Before AI can repair a photo, it first needs to pinpoint the damaged areas. This is achieved using machine learning models trained to recognize patterns that separate physical damage from intentional elements in the image.
Machine Learning and Damage Detection
AI learns to identify damage through extensive training, enabling it to differentiate between degraded and intact parts of a photo. The Pixelift team explains:
The AI essentially learns what 'damage' looks like versus what 'clean photo' looks like, and transforms one into the other.
A common approach involves encoder-decoder architectures. These systems create a damage mask to highlight affected pixels. Advanced models, such as Seedream and Nano Banana 2, take this further by analyzing the entire image in one go. They factor in elements like environmental lighting and shadow consistency to make more accurate assessments.
Once the damage is mapped, AI fine-tunes its analysis to separate accidental scratches from intentional details.
Distinguishing Damage from Image Features
After identifying areas of damage, the AI faces the challenge of distinguishing between unwanted artifacts and genuine features. For instance, it must differentiate scratches from intentional elements like hair strands, fabric folds, or shadows. This is achieved through structural signature analysis. Sarah Chen explains:
Scratches have a unique pattern that AI models learn to detect reliably: they are narrow, high-contrast linear features that run across image content without following the structure of the scene.
For example, a scratch cutting across a face disrupts the natural contours and runs in an inconsistent direction - an anomaly AI can quickly identify. Facial models add another layer of precision when damage interferes with key features. Some algorithms even use mathematical techniques like bandpass filtering and Hough transforms to trace scratch paths while ignoring background textures.
The accuracy of this process depends heavily on high-quality input. Scanning photos at a resolution of at least 600 DPI ensures even fine scratches are captured clearly, allowing for precise mapping.
These detection methods are the foundation of AI-powered photo restoration, ensuring that only true imperfections are targeted for repair.
Techniques AI Uses to Repair Scratches
Once AI identifies damaged areas in an image, the next step is to reconstruct the missing or distorted content. The primary method it uses for this is inpainting, which fills in the gaps by analyzing the surrounding areas. Essentially, AI "guesses" what should be in the missing parts based on the context provided by the undamaged portions of the image.
Inpainting Technology for Photo Repairs
Inpainting follows a two-step process: First, the AI uses a damage mask to pinpoint areas that need fixing. Then, it fills those areas using content-aware reconstruction techniques. It takes into account details like lighting, textures, colors, and perspective to seamlessly integrate the repaired sections.
A key tool in this process is diffusion models, which start with random noise and gradually refine it to match the surrounding image. These advanced models work on the entire photo in one pass, ensuring consistent lighting and tones, especially for elements like skin. This approach has outperformed older methods that relied on multiple smaller models, which often introduced errors that compounded over time.
For the best results, extend the damage mask about 10–15% beyond the actual scratch to ensure smooth blending. If the damage is extensive, tackle it in stages - address the major scratches first, then refine the image with a second pass to clean up any lingering imperfections.
Generative Fill and Content-Aware Algorithms
AI also uses generative fill to handle more complex textures and patterns. Unlike basic cloning tools that simply copy nearby pixels, generative fill understands the structure and context of the image. It can interpret elements like fabric folds, lighting, and texture transitions, allowing it to recreate missing details in a way that feels natural and seamless.
Step-by-Step Guide to Restoring Photos with AI
Uploading and Preparing Your Photo
The success of your photo restoration starts with how you handle the original image. For best results, scan your photo using a flatbed scanner at 600 DPI or higher, and save the file as a lossless TIFF or a high-quality PNG to retain as much detail as possible.
Before scanning, clean the photo gently with a lint-free cloth to remove dust and debris. Scan the image in color, turn off any automatic corrections, and avoid using flash. If you don’t have access to a scanner, you can use a high-quality scanning app, but ensure you’re in a well-lit environment for the clearest results.
"The quality of your restoration depends heavily on the quality of your scan. Garbage in, garbage out." - Pixelift Team
Once your photo is prepped and scanned, you’re ready to move on to the automated restoration process.
Automated Restoration Process
AI restoration tools make the process straightforward, often featuring drag-and-drop interfaces that accept common file types like JPG, PNG, and TIFF. After uploading your image, select the appropriate mode, such as "Dust & Scratch" or "Scratch Repair", to let the AI analyze and identify areas of damage.
The restoration process typically takes 15 to 60 seconds. During this time, the AI creates a damage mask, detects scratches, and repairs missing pixels by referencing the surrounding areas. It’s generally a good idea to fix scratches first, then proceed to optional enhancements like colorization or upscaling. Running a second pass often helps refine the results and address any lingering flaws.
Reviewing and Refining Results
Once the AI finishes its work, take a close look at the results. Use tools like a before/after slider to compare the restored image with the original. Zoom in on crucial areas - especially faces - to ensure that textures look natural and key features remain accurate.
If you notice imperfections, you can rerun the restoration process or make adjustments with manual tools such as the Healing Brush or AI Eraser. When you’re happy with the final result, save the restored image as a PNG or TIFF to maintain its quality.
Additional AI Restoration Features Beyond Scratch Removal
AI tools go far beyond just fixing scratches - they can also reduce noise, restore color, and sharpen details to breathe new life into old photos.
Noise Reduction and Grain Removal
Modern AI models, like Seedream and Nano Banana 2, use deep neural networks to distinguish between actual photo details and unwanted noise. These tools can effectively remove "salt and pepper" noise, common in vintage prints, while preserving fine textures like skin pores. This ensures that the image retains its natural look and doesn't lose important details.
For the best results, high-resolution scans are essential. It's also a good idea to turn off automatic sharpening or dust removal on your scanner, as these features can introduce artifacts that confuse AI algorithms. Additionally, saving scans in lossless formats like TIFF or high-quality PNG helps prevent compression artifacts that could be misinterpreted as noise by the AI.
Once noise is reduced, the AI moves on to refining color tones for a more natural appearance.
Color Restoration and Enhancement
AI doesn't just guess when it comes to restoring color - it carefully analyzes elements like clothing, skin tones, foliage, and architecture to apply hues that fit the era and context of the photo. In fact, restoration tools have achieved over a 95% success rate in reversing color fading. It's important to repair scratches and stains before colorizing, as these imperfections can lead to inaccuracies.
Even with black-and-white photos, scanning in color mode can capture subtle tonal details that help the AI understand the image better. After the initial restoration, fine-tuning the color balance and saturation ensures the final result looks natural and aligns with any known references.
Detail Sharpening and Clarity Improvement
AI takes sharpening to the next level with super-resolution techniques, which enhance resolution by 2×, 4×, or even 8×. Instead of simply enlarging pixels, these methods generate realistic fine details. Tools like GFPGAN and CodeFormer are particularly effective for restoring blurred facial features and bringing back natural skin textures.
One notable example comes from April 2026, when Michael Chen restored a 1947 wedding portrait. He managed to recover intricate lace details on a veil and even individual eyelashes that had been obscured by cracks.
"GFPGAN... knows that skin has pores and fine wrinkles and peach fuzz, not the smooth plastic look of earlier models."
– Michael Chen, Photo Restoration Specialist, ArtImageHub
Newer diffusion-based models simplify the process by combining all restoration tasks into a single step. This approach avoids the overly "plastic" look that can occur when using multiple models in sequence. However, AI restoration is most effective when less than 40–50% of the original image is missing or severely damaged.
Supported Image Types and Limitations of AI Restoration
When diving into advanced photo restoration, it's important to understand which types of images AI handles best and where its capabilities fall short. Knowing these details can help you achieve the best possible results while managing expectations.
Types of Photos AI Can Restore
AI restoration tools work well with a variety of photo types, including black-and-white, sepia, and faded color prints. For these, success rates often exceed 95% for specific types of damage. These tools also handle film negatives and physical photos from any era, whether they’re daguerreotypes, tintypes, or albumen prints. To preserve details, it's best to use file formats like TIFF or lossless PNG. While JPEGs are widely accepted, their compression artifacts can sometimes confuse the AI during damage detection.
AI excels at fixing physical damage like scratches, scuffs, tears, and creases. It also addresses environmental damage, such as water stains, mold, yellowing, and foxing, as well as exposure issues like fading or overexposure. Success rates vary depending on the damage type:
- Light scratches and color fading: Restored with a success rate of 95% or higher.
- Water stains: Typically restored with an 85–95% success rate.
- Deep tears: Success rates range from 80–90%.
While these capabilities are impressive, certain types of damage or conditions can still pose challenges.
Limitations of AI Restoration
AI restoration, despite its strengths, has clear limitations. For instance, it struggles when more than 40–50% of the image is damaged. As the Pixelift team explains:
"If more than roughly 40–50% of the image content is missing or destroyed, the AI must invent too much, and results become unreliable."
Deep gouges that completely remove the photographic emulsion are particularly problematic. Since there’s no underlying data for the AI to work with, it relies on contextual inference, which can introduce subtle artifacts. Similarly, photos with hundreds of overlapping fine scratches can confuse the AI, as the damage mask often overlaps with actual image details.
Other limitations include low-resolution or blurry scans, which make it harder for the AI to distinguish damage from the photo’s content. Additionally, while AI can infer natural colors like the blue of the sky or the green of grass, it cannot accurately recreate the specific historical colors of unique items like clothing or vehicles in black-and-white photos. These colors often remain educated guesses.
Conclusion
AI has transformed photo restoration from a time-consuming and expensive process into something that can be done in seconds. Today’s advanced models can repair scratches, restore faded colors, and upscale images all at once - avoiding the overly smooth, artificial look that older methods often produced.
This technology shines when it comes to rescuing memories from damaged photos. It achieves success rates of over 95% for minor issues like light scratches and fading, and an impressive 80–90% for more severe damage, such as deep tears. As the Pixelift team explains:
"Every damaged photo is a memory at risk of being lost forever. The technology to save these memories is here, it is affordable, and it is remarkably effective."
For families looking to safeguard their cherished images, AI tools like NanoGPT make this process both practical and accessible. These platforms provide secure, pay-as-you-go access to advanced restoration models, with all data processed locally on your device. Prices start at just $0.10 per image, a small fraction of what traditional restoration services cost. Whether you’re restoring a single meaningful photo or digitizing an entire album, AI makes it easy to preserve these precious moments before they’re gone.
To get the best results, scan your photos in high resolution, save them as PNG or TIFF to avoid compression issues, and follow this sequence: restore → colorize → upscale. This approach not only ensures better outcomes but also helps preserve your family’s visual history for future generations.
FAQs
How do I scan an old photo for the best AI repair results?
For the best results when using AI for photo repair, start by scanning your photo at a high resolution - at least 300 DPI. This ensures that all the fine details are captured. Use a flatbed scanner that's clean and free of dust to avoid imperfections. Save your scanned image as a high-quality file, such as JPG or PNG. Also, make sure your photo is well-lit during the scanning process to prevent shadows from affecting the image. Following these steps will give you a clear, detailed digital file, which is essential for effective AI restoration.
When should I use a second repair pass or manual touch-ups?
When the initial AI restoration leaves behind visible scratches, artifacts, or unnatural textures, it's worth using a second repair pass or making manual touch-ups. For severe damage, such as deep scratches, multiple AI passes may be necessary, along with careful manual adjustments. This method ensures that fine details are refined, resulting in a polished restoration for even the most heavily damaged photos.
What damage is too severe for AI to restore reliably?
AI often faces challenges when tasked with restoring photos that have large missing sections or severely damaged faces. In such cases, the AI tends to fill in the blanks by making educated guesses or creating details from scratch. This process can lead to results that stray from the original image, raising questions about the accuracy and authenticity of the restoration. When large parts of an image are missing or the damage is extensive, the AI's capacity to recreate the original details becomes much less reliable.